Imagine embarking on an adventure in your campervan, surrounded by the beauty of nature. Now, picture waking up to the gentle sounds of birdsong instead of the intrusive drone of traffic, or enjoying a peaceful night’s sleep without the drumming of rain on a thin metal roof. This idyllic scenario can become a reality with a crucial step in any campervan conversion or upgrade: sound deadening.
Campervans, by their very nature, often suffer from excessive noise. Their construction typically involves large, thin panels of steel that act like a drum, amplifying every vibration and sound . Whether it’s the rumble of the engine, the roar of tires on the asphalt, or simply the wind whistling past the vehicle, these noises can quickly detract from the comfort and tranquility of your mobile living space. Sound deadening offers a solution, transforming your van from a noisy echo chamber into a serene haven on wheels . This blog post will guide you through the process of effectively sound deadening your campervan, exploring the definition, benefits, materials, installation, key areas to target, best practices, and the investment required to achieve a quieter and more enjoyable journey.
Decoding Decibels: What is Sound Deadening for a Campervan?
In the context of campervan conversions, sound deadening refers to the installation of specific materials designed to reduce noise and vibrations within the vehicle. The primary target of this process is the van’s thin steel body, which, without treatment, readily transmits and amplifies sounds generated from various sources . These sources can include the engine, the tires interacting with the road surface, wind, and external ambient noises. The goal of sound deadening is to dampen the vibrations of these metal panels, thereby reducing the overall noise level experienced inside the campervan .
While the terms are often used interchangeably, it’s helpful to understand the subtle difference between sound deadening and soundproofing . Sound deadening primarily focuses on reducing vibrations within a material, preventing it from resonating and producing noise. Soundproofing, on the other hand, aims to block the transmission of sound waves from one area to another. In the realm of campervan conversions, the application of materials often achieves both to varying degrees, contributing to a significantly quieter interior environment . Ultimately, the aim is to create a more solid and less “tinny” feel within the van. The vibrations of the metal panels are what contribute to that hollow, resonant sound. By effectively dampening these vibrations, the perceived quality and structural integrity of the van are notably improved.
The Sweet Sound of Silence: Unveiling the Benefits of Sound Deadening
Investing time and effort in sound deadening your campervan yields a multitude of benefits that significantly enhance the overall experience of van life .
One of the most noticeable improvements is the reduction in road noise . The constant hum and roar of tires on the road can be incredibly fatiguing, especially on long journeys. Sound deadening materials work to absorb these vibrations, creating a much more comfortable and less stressful driving environment. This allows for easier conversation, enjoyment of music, and a general sense of relaxation while on the move.
Furthermore, sound deadening leads to improved acoustics within the van . By minimising unwanted vibrations and external noise, the sound quality of your music system is enhanced, allowing you to appreciate the nuances of your favourite tunes. Conversations also become clearer, as occupants don’t need to raise their voices to be heard over the din of the road. This creates a better overall entertainment experience and fosters more comfortable communication during travel.
Many sound deadening materials, particularly closed-cell foam and mass-loaded vinyl, also offer enhanced insulation . These materials can contribute to better temperature regulation inside the van, helping to keep it cooler during hot summer months and warmer in colder climates. This secondary benefit can lead to energy savings by reducing the reliance on heating and cooling systems, making your off-grid adventures more sustainable and comfortable.
For those planning to sleep in their campervan, sound deadening is a game-changer for better sleep quality . By reducing noise from rain, wind, and other external sources, it becomes significantly easier to fall asleep and stay asleep, even in less-than-ideal weather conditions. This ensures you wake up feeling refreshed and ready to embrace the day’s adventures.
Sound deadening also contributes to increased privacy . By helping to contain sounds within the van, it prevents conversations and activities from being easily overheard by those outside. This can be particularly valuable for individuals who engage in stealth camping or who simply appreciate a greater sense of seclusion when parked in populated areas.
Finally, sound deadening effectively tackles the issue of reduced rattling . The vibrations of the van’s thin panels and various components can often lead to annoying rattles and squeaks while driving. Sound deadening materials dampen these vibrations, resulting in a more solid and refined driving experience. This contributes to an overall feeling of higher quality and craftsmanship in the converted van, as the absence of unwanted noises elevates the sense of a well-built and maintained mobile home.
Choosing Your Sound-Dampening Arsenal: Types of Materials for Campervans
Selecting the right materials is crucial for achieving effective sound deadening in your campervan. Several options are available, each with its unique properties and benefits .
Butyl-based mats are a popular choice and form the foundation of many sound deadening projects . These self-adhesive mats are made of butyl rubber and typically feature an aluminum foil backing. They excel at reducing vibrations and structural noise by converting vibrational energy into heat . Popular brands in this category include FatMat Rattle Trap , Kilmat , Noico , Dynamat , Hush Mat , and SoundSkins . While highly effective at damping vibrations, butyl mats offer limited insulation against ambient noise and are often paired with other materials for optimal results .
Closed-cell foam is another valuable material that is lightweight and provides both sound and thermal insulation . It helps to absorb mid to high-frequency sounds and reduces heat transfer. Closed-cell foam is often applied as a second layer on top of butyl mats to enhance both sound and thermal performance . Examples of popular closed-cell foam products include Armaflex and 3M Thinsulate , with 3M Thinsulate being particularly noted for its excellent thermal and sound insulation properties . ThermoLiner is another option in this category .
For those seeking maximum noise reduction, mass-loaded vinyl (MLV) is a dense and heavy material that acts as a highly effective sound barrier . It excels at blocking the transmission of noise and also offers some vibration deadening and ambient sound dampening properties . MLV can also improve the interior acoustics of the van and is often used on top of butyl mats and closed-cell foam layers . Its high mass makes it difficult for sound waves to pass through, providing a significant barrier against a wide range of frequencies.
Sound deadening pastes and paints, also known as liquid deadeners, are butyl rubber-based products that are applied as a coating to the interior surfaces of the van . These products form a thin, lightweight viscoelastic layer that effectively dampens sound . While generally less effective than butyl mats for vibration damping, liquid deadeners can be particularly useful for treating hard-to-reach areas and complex shapes like wheel wells . LizardSkin and Silent Running SR-500 are well-regarded manufacturers of these types of products.
Beyond these primary materials, other options can contribute to sound deadening. Mineral wool, fiberglass, cellulose, and spray foam are primarily used for thermal insulation but also offer some sound-dampening benefits . Additionally, sealants, such as weatherstripping and acoustic caulk, play a crucial role in blocking sound from entering the van through cracks and gaps around doors, windows, and vents.
To help you choose the right materials for your campervan sound deadening project, consider the following comparison:
| Material Type | Primary Benefit | Secondary Benefits | Typical Applications | Considerations |
|---|---|---|---|---|
| Butyl Mats | Vibration Damping | Some Thermal Insulation | Large Metal Panels | Limited Ambient Noise Insulation |
| Closed-Cell Foam | Sound Absorption & Thermal Insulation | Some Sound Absorption | Over Butyl Mats | Can be Bulky |
| Mass-Loaded Vinyl (MLV) | Sound Blocking | Vibration Damping & Improved Acoustics, Some Thermal Insulation | Over Butyl Mats & Foam | Heavy & Requires Strong Adhesive |
| Sound Deadening Pastes/Paints | Flexible Application & Vibration Damping | Lightweight | Hard-to-Reach Areas, Wheel Wells | Less Effective than Mats for Vibration Damping |
Silence in Action: A Step-by-Step Guide to Installing Sound Deadening
Installing sound deadening in your campervan is a DIY-friendly project that can yield significant results. Here’s a step-by-step guide to help you through the process .
Preparation is Key: Begin by thoroughly cleaning all metal surfaces within your van using a degreaser, such as a simple vinegar solution , and a microfiber cloth . This ensures proper adhesion of the sound deadening materials by removing any dirt, grease, or rust . Make sure the surfaces are completely dry . Next, remove any existing interior panels, trim, and carpets to gain access to the bare metal. Finally, inspect the van’s body for any holes, rust spots, or damage and repair these areas to prevent sound leaks.
Applying Butyl Mats: Once the surfaces are clean and prepped, you can begin applying the butyl mats. Measure the areas you plan to cover, such as the doors, walls, roof, wheel arches, and floor, and cut the butyl mats accordingly using a utility knife or heavy-duty scissors . For complex shapes, consider creating cardboard templates. Remember that most vans are symmetrical, so using templates can help create mirrored sheets for opposite sides . Peel off the adhesive backing and carefully apply the mat directly to the clean metal surface. It’s often helpful to peel back only half of the backing initially . Before fully adhering the mat, offer it up to the space to check the fit . Starting at one end, smooth the mat out to avoid trapping air bubbles. Use a roller tool (often included with the mats ) to firmly press the mat into place, ensuring maximum contact with the metal for optimal sound damping . Apply pressure from the centre outwards. For stronger areas like wheel arches and the floor, the back end of a screwdriver can be helpful for pressing the mat into contours . For vibration damping, aim for 25-50% coverage on large flat panels like walls and doors. For high-noise areas such as wheel arches and the roof, strive for nearly full coverage . Keep in mind that 100% coverage with butyl mats isn’t always necessary to achieve significant results . In colder temperatures, you can use a heat gun or hairdryer on a low setting to make the mats more pliable and improve adhesion .
Applying Closed-Cell Foam: After the butyl layer, you can apply closed-cell foam, such as Thermo Van Liner . Measure and cut the foam to fit the panels . Some foams have an adhesive backing; for others, like Dodo Thermo Fleece , use a spray adhesive . Apply the adhesive to both the foam and the surface . Ensure good contact and avoid creating creases . Peel back half of the backing and apply the foam, then peel off the remaining backing .
Applying Mass-Loaded Vinyl: If you’re using MLV, measure and cut it to the required sizes. This material is heavy, so accurate cuts are beneficial . Apply the MLV directly over the butyl layer using a strong adhesive and tape the edges to seal the seams .
Applying Sound Deadening Paint: For liquid deadeners, protect surrounding areas with painter’s tape and drop cloths . Apply the paint to clean steel surfaces using a sprayer or a brush/roller, aiming for a thickness of 1-2mm . Apply two to three coats, allowing each coat to dry thoroughly according to the manufacturer’s instructions .
Sealing Gaps: Finally, use weatherstripping or acoustic caulk to seal any gaps around doors, windows, vents, and other openings where sound can potentially enter .
Targeting the Noise Hotspots: Key Areas for Sound Deadening Treatment
While sound deadening the entire interior of your campervan will yield the best results, focusing on key areas can provide significant noise reduction .
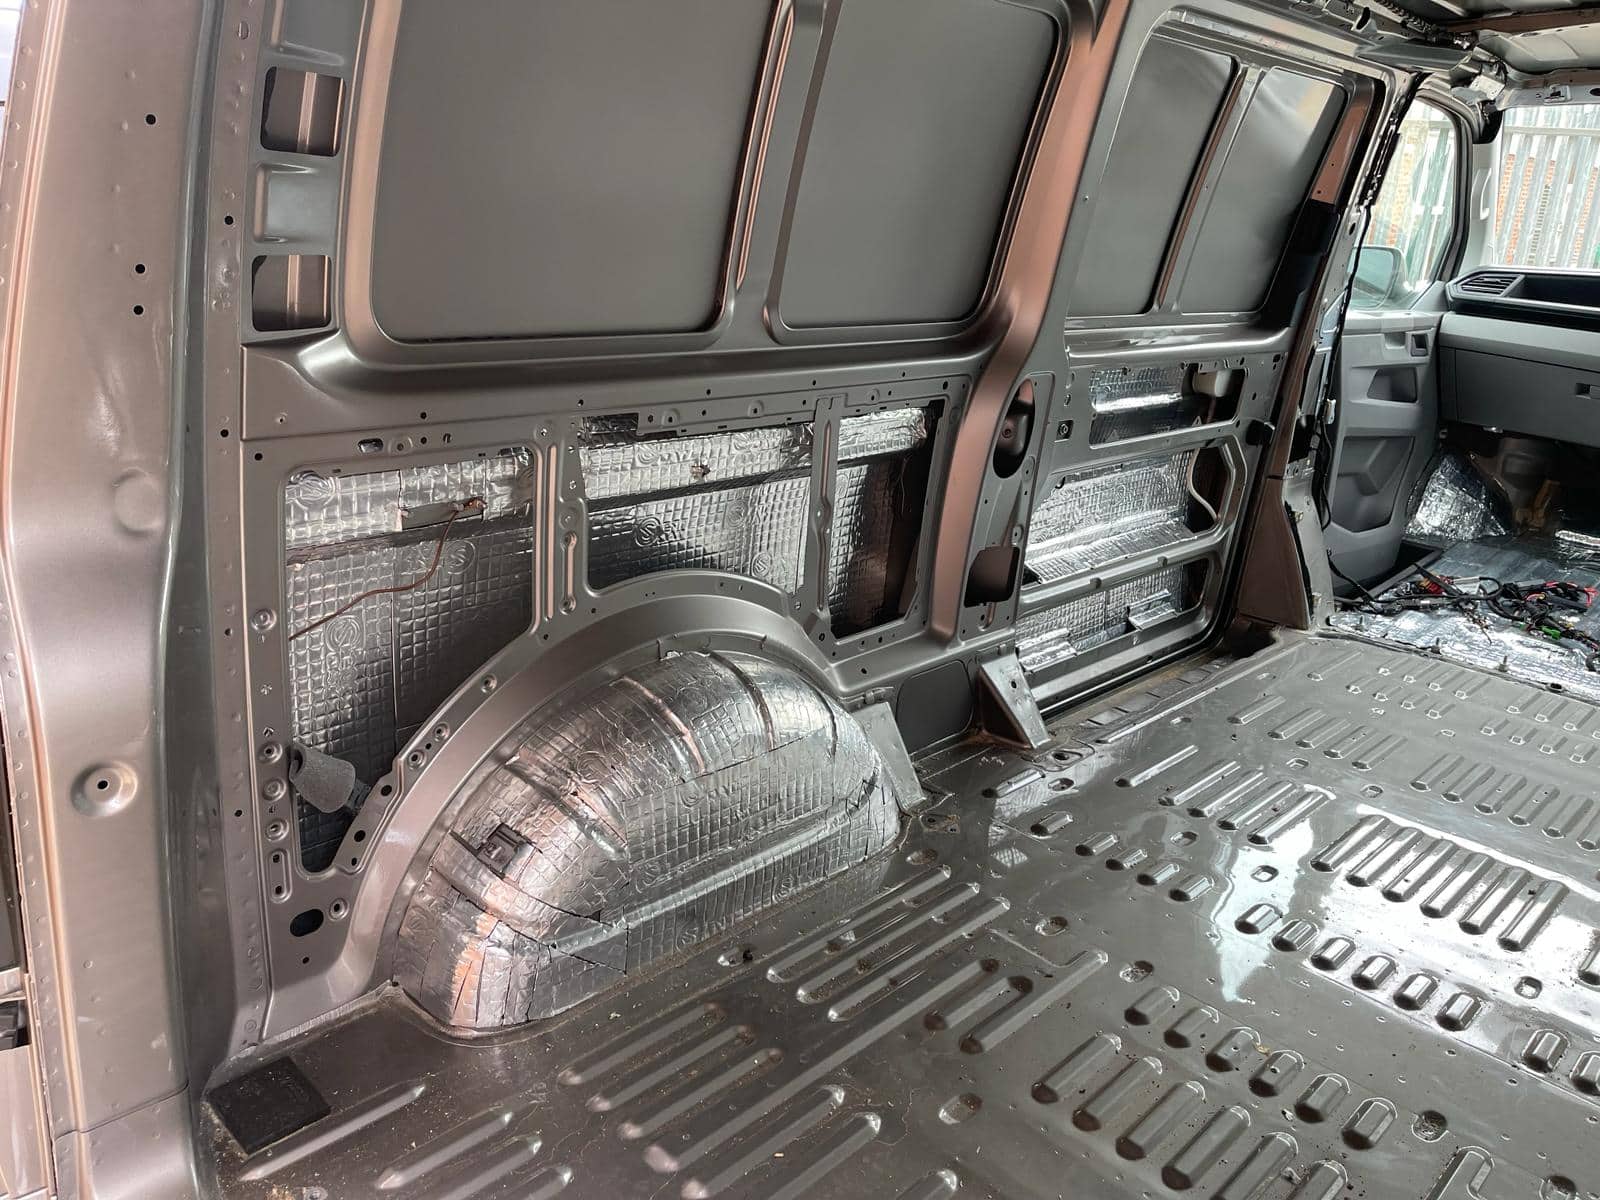
The walls of your campervan, being thin steel, are a major source of both noise transmission and vibration . Aim for 25-50% coverage with butyl mats, followed by a layer of closed-cell foam or other insulation .
The floor is another critical area, as it transmits a significant amount of road and tire noise . For maximum noise reduction, consider applying full coverage of butyl mats followed by a layer of mass-loaded vinyl . Running these materials up to the cabin side firewall can also help to reduce engine noise .
The ceiling of your campervan resonates with external elements like rain, hail, and wind . Aim for nearly full coverage with butyl mats and a layer of insulation. Ensure good adhesion, especially due to the overhead positioning .
Doors, including the driver, passenger, side, and rear doors, are significant entry points for road noise . Apply butyl mats to the larger flat areas (25-50% coverage) and consider adding closed-cell foam insulation inside the door cavities. Sound deadening the doors can also improve the solidness of their closing sound .
Wheel wells are directly exposed to the noise generated by the tires on the road . Aim for complete or near-complete coverage with butyl mats, potentially even applying a double layer for enhanced effect, followed by insulation. Liquid deadener can also be a very effective option for treating the complex shapes of wheel wells .
Prioritising these noise hotspots will provide the most noticeable reduction in the overall noise level within your campervan. Focusing on the largest, flattest panels initially is often a good strategy to maximize the impact of your efforts .
Pro Tips for a Quieter Journey: Best Practices for Effective Sound Deadening
To achieve the most effective sound deadening in your campervan, consider these pro tips and best practices .
While it might seem intuitive to cover every inch of metal with butyl mats, don’t aim for 100% coverage . For vibration damping, 25-50% coverage on large panels is often sufficient . Focus on applying the mats to the center of the panels, as this is where vibrations are typically most pronounced .
For optimal results, combine different materials . Use butyl mats as the first layer to dampen vibrations, and then follow up with a layer of closed-cell foam or mass-loaded vinyl for sound absorption and blocking.
Pay close attention to detail during installation . Ensure that all edges of the sound deadening materials are firmly pressed down with the roller to create a good seal and maximize their effectiveness.
Don’t forget to seal all gaps where sound can enter the van . Use weatherstripping around doors and windows and apply acoustic caulk to any other openings or seams.
When choosing your materials, consider thermal insulation . Many thermal insulation products, such as 3M Thinsulate and mineral wool, also offer excellent sound deadening properties, providing a dual benefit. Some butyl mats can even block conductive heat transfer .
If engine noise is a significant concern, especially in larger vans, consider specifically addressing the engine doghouse with hood liner insulation or mass-loaded vinyl .
To prevent annoying rattles from interior components, dampen vibrating parts . Use rubber pads or felt strips on moving elements like stovetops. Secure any wiring with scraps of sound deadening material to prevent it from vibrating against metal surfaces .
Before starting your sound deadening project, listen to your van . Take it for a drive while it’s still empty to identify the specific areas that generate the most noise. This will help you prioritize your efforts and focus on the most problematic zones. You can even use a dB meter app on your smartphone to measure the noise levels before and after the installation to quantify the improvement .
Regularly check and maintain the weatherstripping around your doors and windows to ensure a tight seal against outside noise .
Finally, be aware that the roof fan can be a significant source of noise, especially at higher speeds. Consider installing an interior cover or opting for a quieter fan model if noise from this source is bothersome .
The Investment in Quiet: Understanding the Cost and Time Involved
The cost and time required to sound deaden a campervan can vary depending on several factors, including the size of the van, the type and amount of materials used, and your level of experience with DIY projects .
The cost of materials for a sound deadening project can range from approximately £50-£200 for a smaller van like a minivan, to £300-£600 or more for larger vans, such as Sprinters, depending on the desired level of coverage and the brand of materials chosen . Specific pre-cut kits designed for particular areas like Sprinter doors can cost between £250 and £350 . Purchasing 80 square feet of quality butyl sound deadening material can cost around £300-£600 . Adding layers of closed-cell foam and mass-loaded vinyl will increase the overall material cost. Sound deadening paint is another option to consider, with varying price points depending on the brand and quantity. Pre-cut sound deadening kits tailored to specific van models are available, offering convenience but potentially at a higher price point .
The time required for a thorough sound deadening job can be significant. Depending on the size of the van and the level of detail involved, it can take anywhere from one to two full days to complete the installation . This timeframe includes the necessary preparation work, such as cleaning the surfaces and removing interior panels. Applying multiple layers of different materials will naturally extend the duration of the project.
While the cost and time investment might seem substantial, the resulting improvement in comfort and noise reduction is often considered well worth it . Careful planning and budgeting before starting the project are essential to ensure a smooth and successful sound deadening endeavor.
| Van Size/Type | Butyl Mat Cost | Other Materials Cost (Foam/MLV – Optional) | Estimated Time |
|---|---|---|---|
| Small Van/Minivan | £50-£200 | £50-£150 | 1 Day |
| Medium Van | £200-£400 | £100-£300 | 1-2 Days |
| Large Van/Sprinter | £300-£600+ | £150-£500+ | 2+ Days |
Beyond the Hush: Uncovering Unique and Often Overlooked Benefits
While the primary goal of sound deadening is noise reduction, it offers several unique and often overlooked benefits that further enhance the value of this investment .
A quieter interior allows your campervan’s sound system to perform more effectively . Without the constant intrusion of road noise and vibrations, the audio output becomes clearer and more immersive, significantly improving your entertainment experience on the road. The sound will be crisper and free from distracting interruptions .
Sound deadening also contributes to enhanced privacy within your mobile living space . By not only keeping outside noise out but also helping to contain sounds from inside the van, it offers a greater sense of seclusion. This can be particularly beneficial for full-time van dwellers or those who frequently engage in stealth camping, providing an added layer of discretion and comfort.
The ability of sound deadening to block out external noise can lead to better sleep, even in noisy locations . This is a significant advantage for travelers who often find themselves parked in areas with ambient noise, ensuring a more restful and restorative sleep experience.
Furthermore, a quieter ride often creates a perceived increase in the overall quality of the vehicle. The absence of rattles, vibrations, and excessive road noise can translate to a feeling of driving a more luxurious and well-built campervan.
While not its primary function, sound deadening materials, especially closed-cell foam and mass-loaded vinyl, offer a degree of thermal regulation as a secondary benefit . These materials can help to insulate the van, contributing to a more stable and comfortable interior temperature regardless of the external climate. Some butyl mats can even block conductive heat transfer through the metal .
These less obvious benefits further underscore the significant impact that sound deadening can have on the overall comfort, functionality, and enjoyment of your campervan conversion.
Conclusion: Embrace the Tranquility of a Sound-Deadened Campervan
Sound deadening is more than just a noise reduction technique; it’s an investment in the overall comfort, liveability, and quality of your campervan. By addressing the inherent noise issues associated with van construction, you can transform your mobile home into a tranquil sanctuary on wheels. From reducing the fatigue of long drives to ensuring peaceful nights of sleep and enhancing your onboard entertainment, the benefits of sound deadening are substantial and far-reaching. If you’re planning a campervan conversion or looking to upgrade your existing setup, consider sound deadening as a crucial step in creating the ultimate home away from home on the open road. Embrace the silence and enjoy the peace and quiet of your sound-deadened campervan on all your future adventure.