Embarking on a campervan conversion opens up a world of adventure and freedom. At the heart of a comfortable and self-sufficient mobile living space lies the fresh water system, and the cornerstone of this system is the fresh water tank. This dedicated container serves as the lifeline for various essential needs, ensuring that you have access to clean water wherever your travels take you . This guide will navigate you through everything you need to know about fresh water tanks in campervan conversions, from understanding their fundamental purpose to exploring the different types available, choosing the right size, ensuring material safety, mastering installation, implementing effective maintenance, and troubleshooting common issues.
What is a Fresh Water Tank in a Campervan?
In the context of a campervan conversion, a fresh water tank is a specifically designed vessel intended for the storage of potable water . This water is meant for consumption and various hygiene-related activities. It is important to distinguish fresh water tanks from other components of a campervan’s water system. Grey water tanks are designed to collect wastewater from sources like sinks and showers . Black water tanks, which are less common in campervans due to the increasing popularity of composting toilets, are used for the storage of toilet waste . The primary role of the fresh water tank is to provide a clean and readily available supply of water for drinking, cooking, cleaning, and maintaining personal hygiene while on the road .
Why a Fresh Water Tank is Essential for Your Van Life
A reliable fresh water tank is fundamental to the van life experience, catering to both basic survival needs and enhancing overall comfort. For fundamental needs, a fresh water supply is critical for staying hydrated, especially during travel and outdoor activities . It is also essential for preparing meals, washing fruits and vegetables, and cleaning up after cooking . Furthermore, maintaining basic hygiene through handwashing and dishwashing relies directly on the availability of fresh water .
Beyond these necessities, a fresh water tank significantly improves the comfort and convenience of van life. It provides immediate access to water for drinking, cooking, cleaning, and personal hygiene without the constant need to seek external sources . This self-sufficiency allows for extended stays in remote areas and the exploration of off-grid locations without the worry of immediate water scarcity . The presence of running water elevates the overall living experience in a campervan, transforming it into a more comfortable and functional home on wheels . In fact, a dependable water system often distinguishes between basic “van camping” and the more comprehensive lifestyle of “van life” . Additionally, having an onboard fresh water tank can lead to potential cost savings by reducing the need to purchase bottled water and enabling stays at less developed campsites, which are often more affordable or even free .
Exploring the Different Types of Fresh Water Tanks
When it comes to selecting a fresh water tank for your campervan conversion, several options cater to varying needs and preferences .
Plastic Jugs/Portable Containers: These are typically individual containers ranging from 5 to 7 gallons in capacity, offering an economical and straightforward solution for water storage . Smaller 1 to 2-gallon containers are also commonly used for immediate drinking water needs. These jugs are generally the most budget-friendly initial option and are easily filled from various sources, including grocery store dispensers and even inside private residences . Their portability makes them easy to remove for cleaning and refilling, and they can even serve other purposes when not used for the main water supply. The setup is minimal, often requiring just the jug itself and perhaps a manual foot pump or a simple gravity-fed system for dispensing water . However, their capacity is limited, necessitating more frequent refills, especially for multiple occupants or longer journeys . Dispensing water often involves manual effort, and the jugs can take up valuable interior living space . While a practical starting point for minimal water requirements or budget-conscious builds, portable jugs might become less convenient for full-time van dwellers or those with higher water consumption.
Built-in Tanks: These are fixed tanks designed for integration into the van’s structure, offering a more permanent and often higher-capacity water storage solution . They typically range from 10 to over 40 gallons, with some larger conversions opting for tanks holding up to 100 gallons . Built-in tanks come in several configurations, each with its own set of advantages and disadvantages.
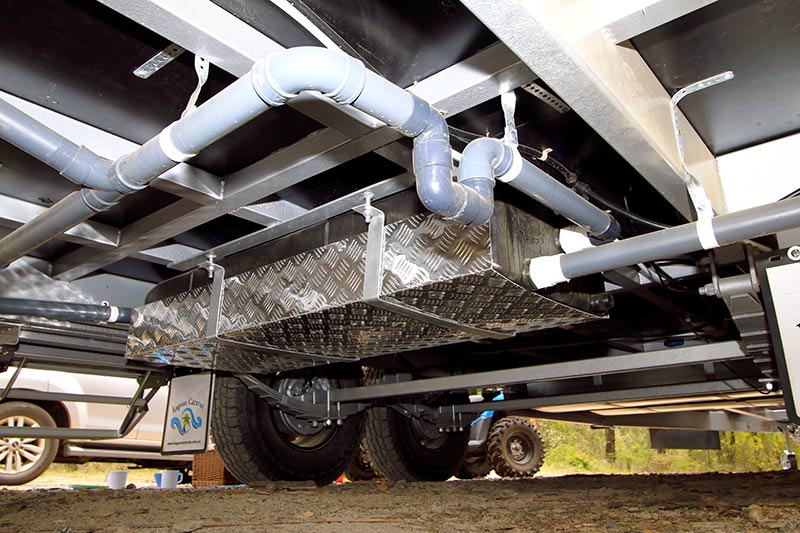
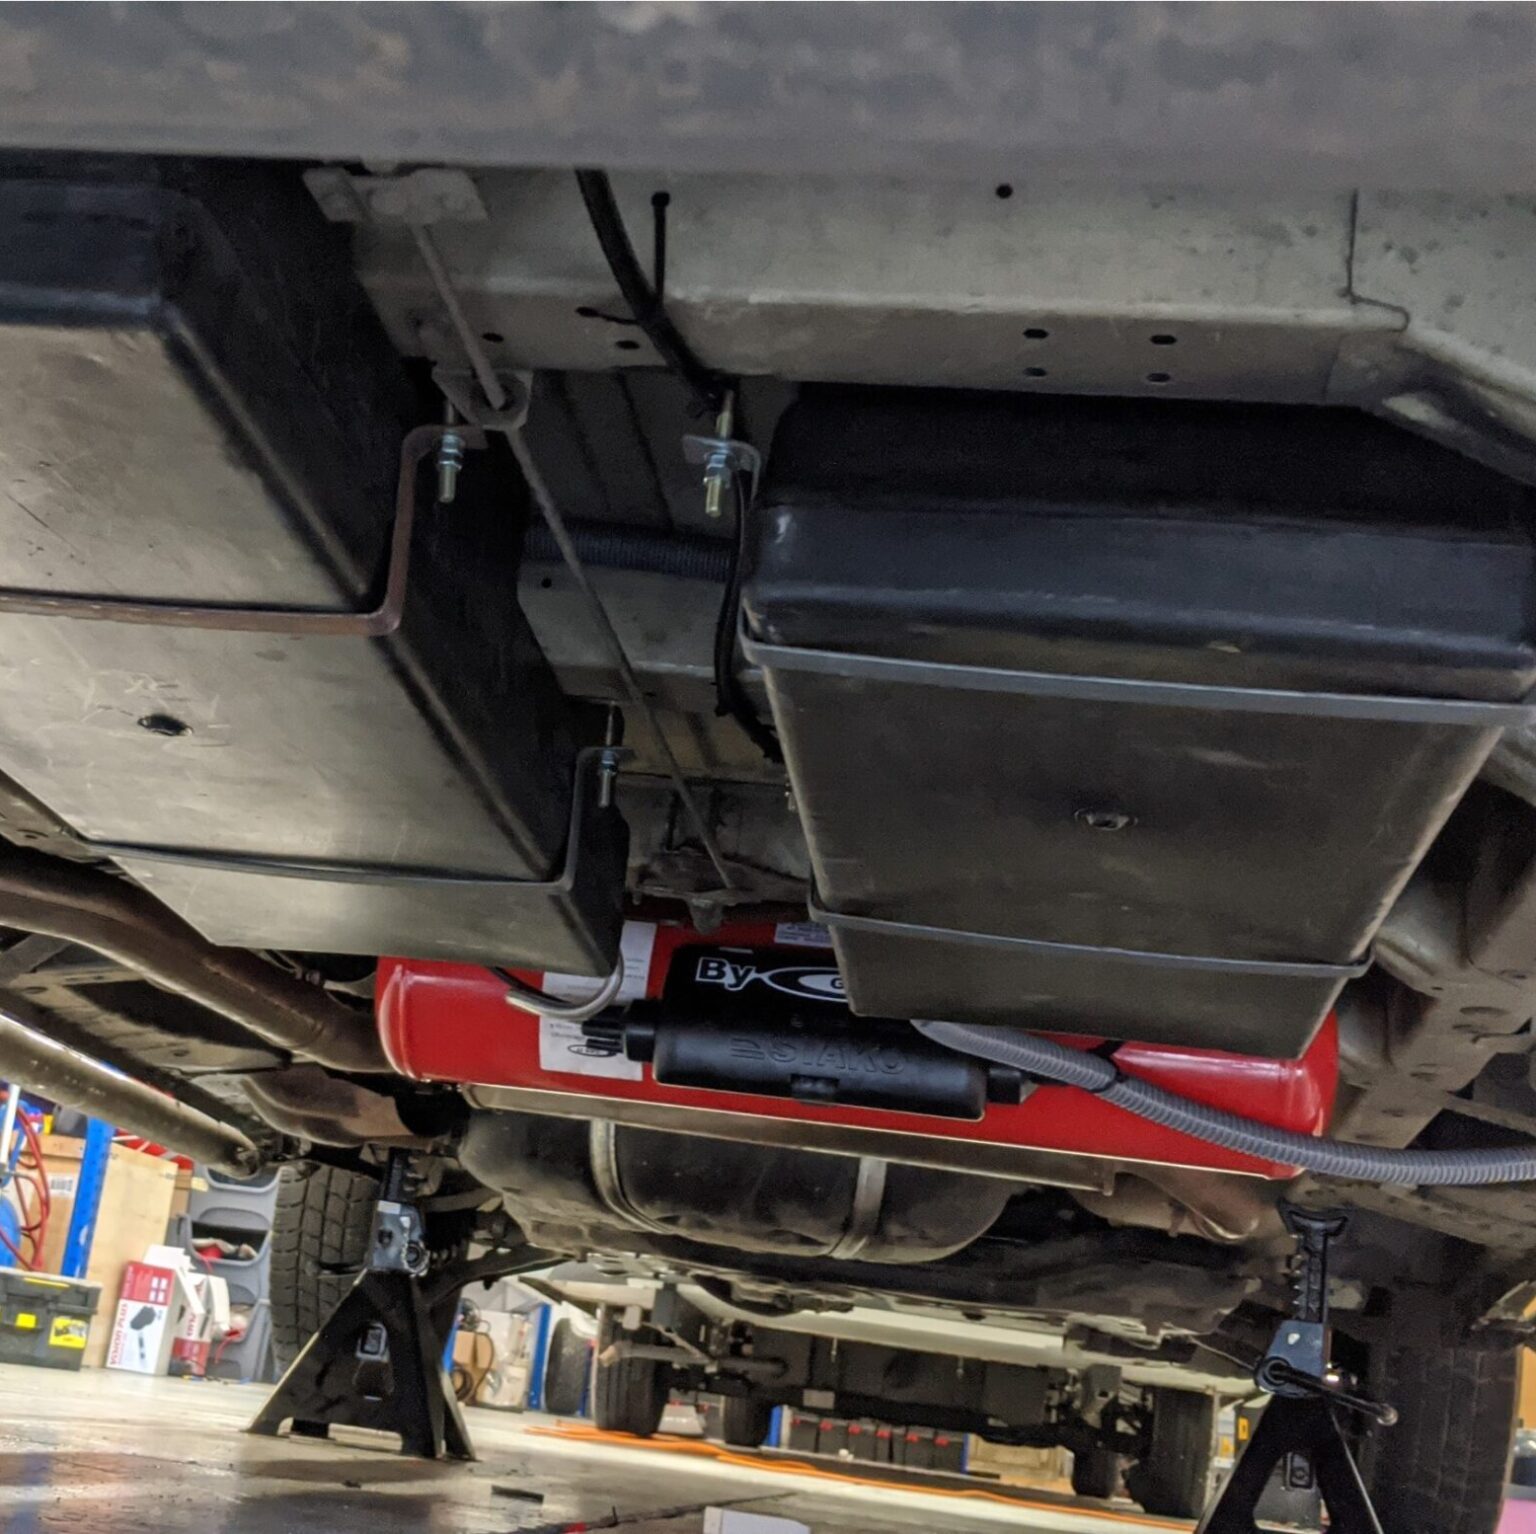
- Under-Floor Tanks: Mounted beneath the van’s chassis, these tanks excel at saving valuable interior space and can offer substantial water capacities . However, their installation is more complex, and they are susceptible to freezing in cold weather, requiring proper insulation and potentially heating solutions . Finding free refill stations with hose connections suitable for under-floor tanks can also be more challenging . Therefore, under-floor tanks necessitate careful consideration of the climate in which the van will be used and potential protection from road debris. It is crucial to use opaque tanks to prevent the growth of algae .
- Wheel Well Tanks: Ingeniously shaped to fit over the van’s wheel wells, these tanks are excellent for optimizing otherwise unused space and contribute to a lower center of gravity, which can improve the van’s handling . However, they can be more expensive than standard rectangular tanks , and their capacity is naturally limited by the size of the wheel well. They may also require purchasing specialized tanks designed for specific van models . Wheel well tanks present a clever solution for maximizing space efficiency, particularly in smaller van conversions.
- Rectangular Tanks: These are standard-shaped tanks often installed inside the van, typically at the rear or beneath a sink unit . They offer a relatively straightforward installation process compared to under-floor options and are available in various sizes. However, they do occupy valuable interior storage space, and careful consideration of weight distribution is necessary . Placing these tanks internally provides better protection against freezing temperatures .
- Custom-Built Tanks: For those with unique space constraints or a desire to maximize every available inch, custom-built tanks can be designed to fit specific and unusual areas within the van. While offering the ultimate in space utilisation, they can be the most expensive option and require meticulous planning and fabrication.
In general, built-in tanks offer the significant advantages of larger capacity for extended off-grid adventures and the convenience of readily available water through a pump and plumbing system . This reduces the frequency of refills and contributes to a more integrated and professional feel to the campervan conversion. Conversely, they add weight, require dedicated installation space, pose a risk of freezing in cold climates if not properly protected, and involve a more complex installation process that may include plumbing and electrical connections for a water pump . Thorough cleaning can also be more challenging depending on the tank’s design and accessibility.
To provide a clear comparison, the following table summarizes the pros and cons of different fresh water tank types:
| Feature | Plastic Jugs/Portable Containers | Built-in Tanks (General) | Under-Floor Tanks | Wheel Well Tanks | Rectangular Tanks (Internal) | Custom-Built Tanks |
|---|---|---|---|---|---|---|
| Cost | Low | Medium to High | Medium to High | Medium to High | Medium | High |
| Capacity | Low | Medium to High | High | Low to Medium | Medium to High | Variable |
| Installation | Very Easy | More Complex | Complex | Moderate | Moderate | Very Complex |
| Space Usage | Can be Inefficient | Efficient | Saves Interior Space | Optimizes Dead Space | Takes Interior Space | Maximum Space Utilization |
| Portability | High | Low | Low | Low | Low | Low |
| Freezing Risk | Low (can be brought inside) | Medium to High | High (requires protection) | Medium (if underslung) | Medium (if internal) | Medium to High |
| Refilling | Easy at Various Sources | Requires Hose Connection | Requires Hose Connection | Requires Hose Connection | Requires Hose Connection | Requires Hose Connection |
| Weight | Lightweight (when empty) | Adds Significant Weight | Adds Significant Weight | Adds Moderate Weight | Adds Significant Weight | Adds Significant Weight |
| Cleaning | Easy | Can be Difficult | Can be Difficult | Can be Difficult | Can be Difficult | Can be Difficult |
Choosing the Right Size: A Balancing Act
Selecting the appropriate size for your fresh water tank involves carefully considering several interconnected factors .
Water Usage Per Person: Estimating your daily water consumption is the first crucial step. Most individuals living in campervans typically use between 1 and 4 gallons of water per day . This can vary based on personal habits, such as the frequency and duration of showers . A general breakdown can include approximately 1.5 gallons per day for drinking between one person and a pet , water used for cooking and washing dishes which can range from 2 to 4 gallons daily for a couple who cook frequently , and showering, which can use around 3 gallons per shower if water is conserved , or about 6 gallons per week for someone who showers less frequently . Conducting a personal “van life water audit” can provide a more accurate understanding of individual water needs . Additionally, installing low-flow showerheads can significantly reduce water consumption during showers .
Trip Duration and Frequency of Refills: Your travel style plays a significant role in determining the ideal tank size. Weekend getaways will have different water requirements compared to extended off-grid adventures . It is also important to consider the accessibility of water sources along your intended routes . Planning your trips with knowledge of campgrounds offering water hookups and other potable water sources is essential. It is always wise to verify the availability of these sources in advance. While a larger tank allows for longer periods between refills, it also adds more weight to the vehicle. Therefore, striking a balance between water capacity and the convenience of refills is a key consideration.
Available Space in the Van: The physical space available within your campervan will significantly influence the type and size of fresh water tank you can install . Carefully measure the potential installation locations, ensuring that the tank will fit without obstructing other vital components or compromising your living space. Consider the different tank shapes available; wheel well tanks and custom-designed tanks can be particularly useful for maximising the utilisation of available space. Ultimately, the space constraints within your van might dictate the practical limitations on the size and type of tank you can realistically accommodate.
Weight Capacity Considerations: Water is a substantial weight factor in a campervan conversion. As a general rule, 1 liter of water weighs 1 kilogram, and 1 gallon of water weighs approximately 8.34 pounds . This means that a fully filled 40-gallon tank will add over 330 pounds to your vehicle’s weight! This additional weight has a direct impact on fuel efficiency, potentially reducing the miles per gallon your van achieves. Furthermore, it is crucial to be aware of your van’s gross vehicle weight rating (GVWR), which is the maximum permissible total weight of a fully loaded vehicle. Exceeding this limit can lead to safety hazards and reduced vehicle performance. When installing a large fresh water tank, it is also important to consider weight distribution. Ideally, the tank should be placed in a location that helps balance the weight of other heavy components, such as batteries. Mounting it in the middle of the van’s garage area or on the opposite side from a heavy battery bank are common strategies for achieving better weight balance . Overlooking the weight of the fresh water can have significant implications for safety and vehicle performance. Some van dwellers choose to travel with a partially filled tank to better manage the overall weight.
Material Matters: Ensuring Safe and Clean Water
The material used to construct your fresh water tank is paramount for ensuring the safety and cleanliness of your water supply .
Importance of Food-Grade Materials: Using food-grade materials is essential to prevent the leaching of harmful chemicals into your drinking water, especially when the tank is exposed to high temperatures . Common food-grade plastics used for fresh water tanks include High-Density Polyethylene (HDPE) and Medium-Density Polyethylene (MDPE) . It is always advisable to carefully review the manufacturer’s specifications to confirm that the chosen tank is indeed made from food-grade material. Containers not specifically designed for storing freshwater can release chemicals that contaminate the water, posing a health risk .
Other Materials: While plastic is the most common material, stainless steel is another excellent option for fresh water tanks. It is durable, food-grade, and resistant to corrosion, although it tends to be more expensive than plastic. The thickness and color of the plastic also matter. Tanks with thicker walls, typically around 3 to 5 millimeters or more, generally offer better durability . Opting for opaque or darker-colored tanks can help inhibit the growth of algae within the tank, especially if it is exposed to sunlight .
Materials to Avoid: It is crucial to avoid using non-food-grade plastics for your fresh water tank, as these may contain substances that can leach into and contaminate your water supply. Similarly, materials prone to rust or corrosion should be avoided unless they are specifically treated and designed for potable water storage. It has also been noted that red-colored plastic components might not be suitable for potable water systems .
Installation Guide: Setting Up Your Fresh Water Tank
Proper installation of your fresh water tank is crucial for its functionality, longevity, and the safety of your water system .
Placement Considerations: The location of your fresh water tank should take into account several factors. As previously discussed, weight distribution is important for maintaining the van’s balance and handling. Ensure that the placement of the tank helps to distribute the overall load effectively, especially in relation to other heavy components. Accessibility is another key consideration. The tank should be located in a way that allows for easy access for filling, routine cleaning, regular maintenance, and potential removal if necessary. For internal tanks, consider protecting them from accidental damage that might occur during daily use. If you opt for an underslung tank, think about shielding it from potential damage caused by road debris. Finally, plan the tank’s placement in relation to other components of your water system, such as the water pump, plumbing lines, and a potential water heater, to ensure efficient connections and functionality.
Methods for Securing the Tank Safely: Given the significant weight of a full water tank, securing it properly is paramount for safety during travel . For internal tanks, use robust straps, such as cargo lashing straps, sturdy brackets, or a custom-built wooden cradle to prevent any movement while driving . Ensure these securing mechanisms are attached to the van’s frame or other strong structural elements. Bolting the tank through the floor or walls using nuts and washers is a common practice, and using nylock nuts is recommended to prevent them from loosening due to vibrations experienced during travel . Underslung tanks typically come with specific mounting kits designed to securely attach them to the vehicle’s chassis . When installing these, ensure that all mounting points are solid and correctly fastened. Even portable water jugs should be secured to prevent them from shifting during transit, potentially using straps or designated storage compartments.
Connecting to the Water System: Connecting the fresh water tank to the rest of your campervan’s water system involves several key steps .
- Inlet for Filling: Install a dedicated water tank filler with a valve, which is typically accessible from the exterior of the van . Ensure that the filler is mounted at a higher level than the top of the water tank to prevent any backflow . Use a food-grade hose specifically designed for potable water to connect your water source to the filler. Many conversions also incorporate a water filter at the inlet to remove any particles or impurities before they enter the tank .
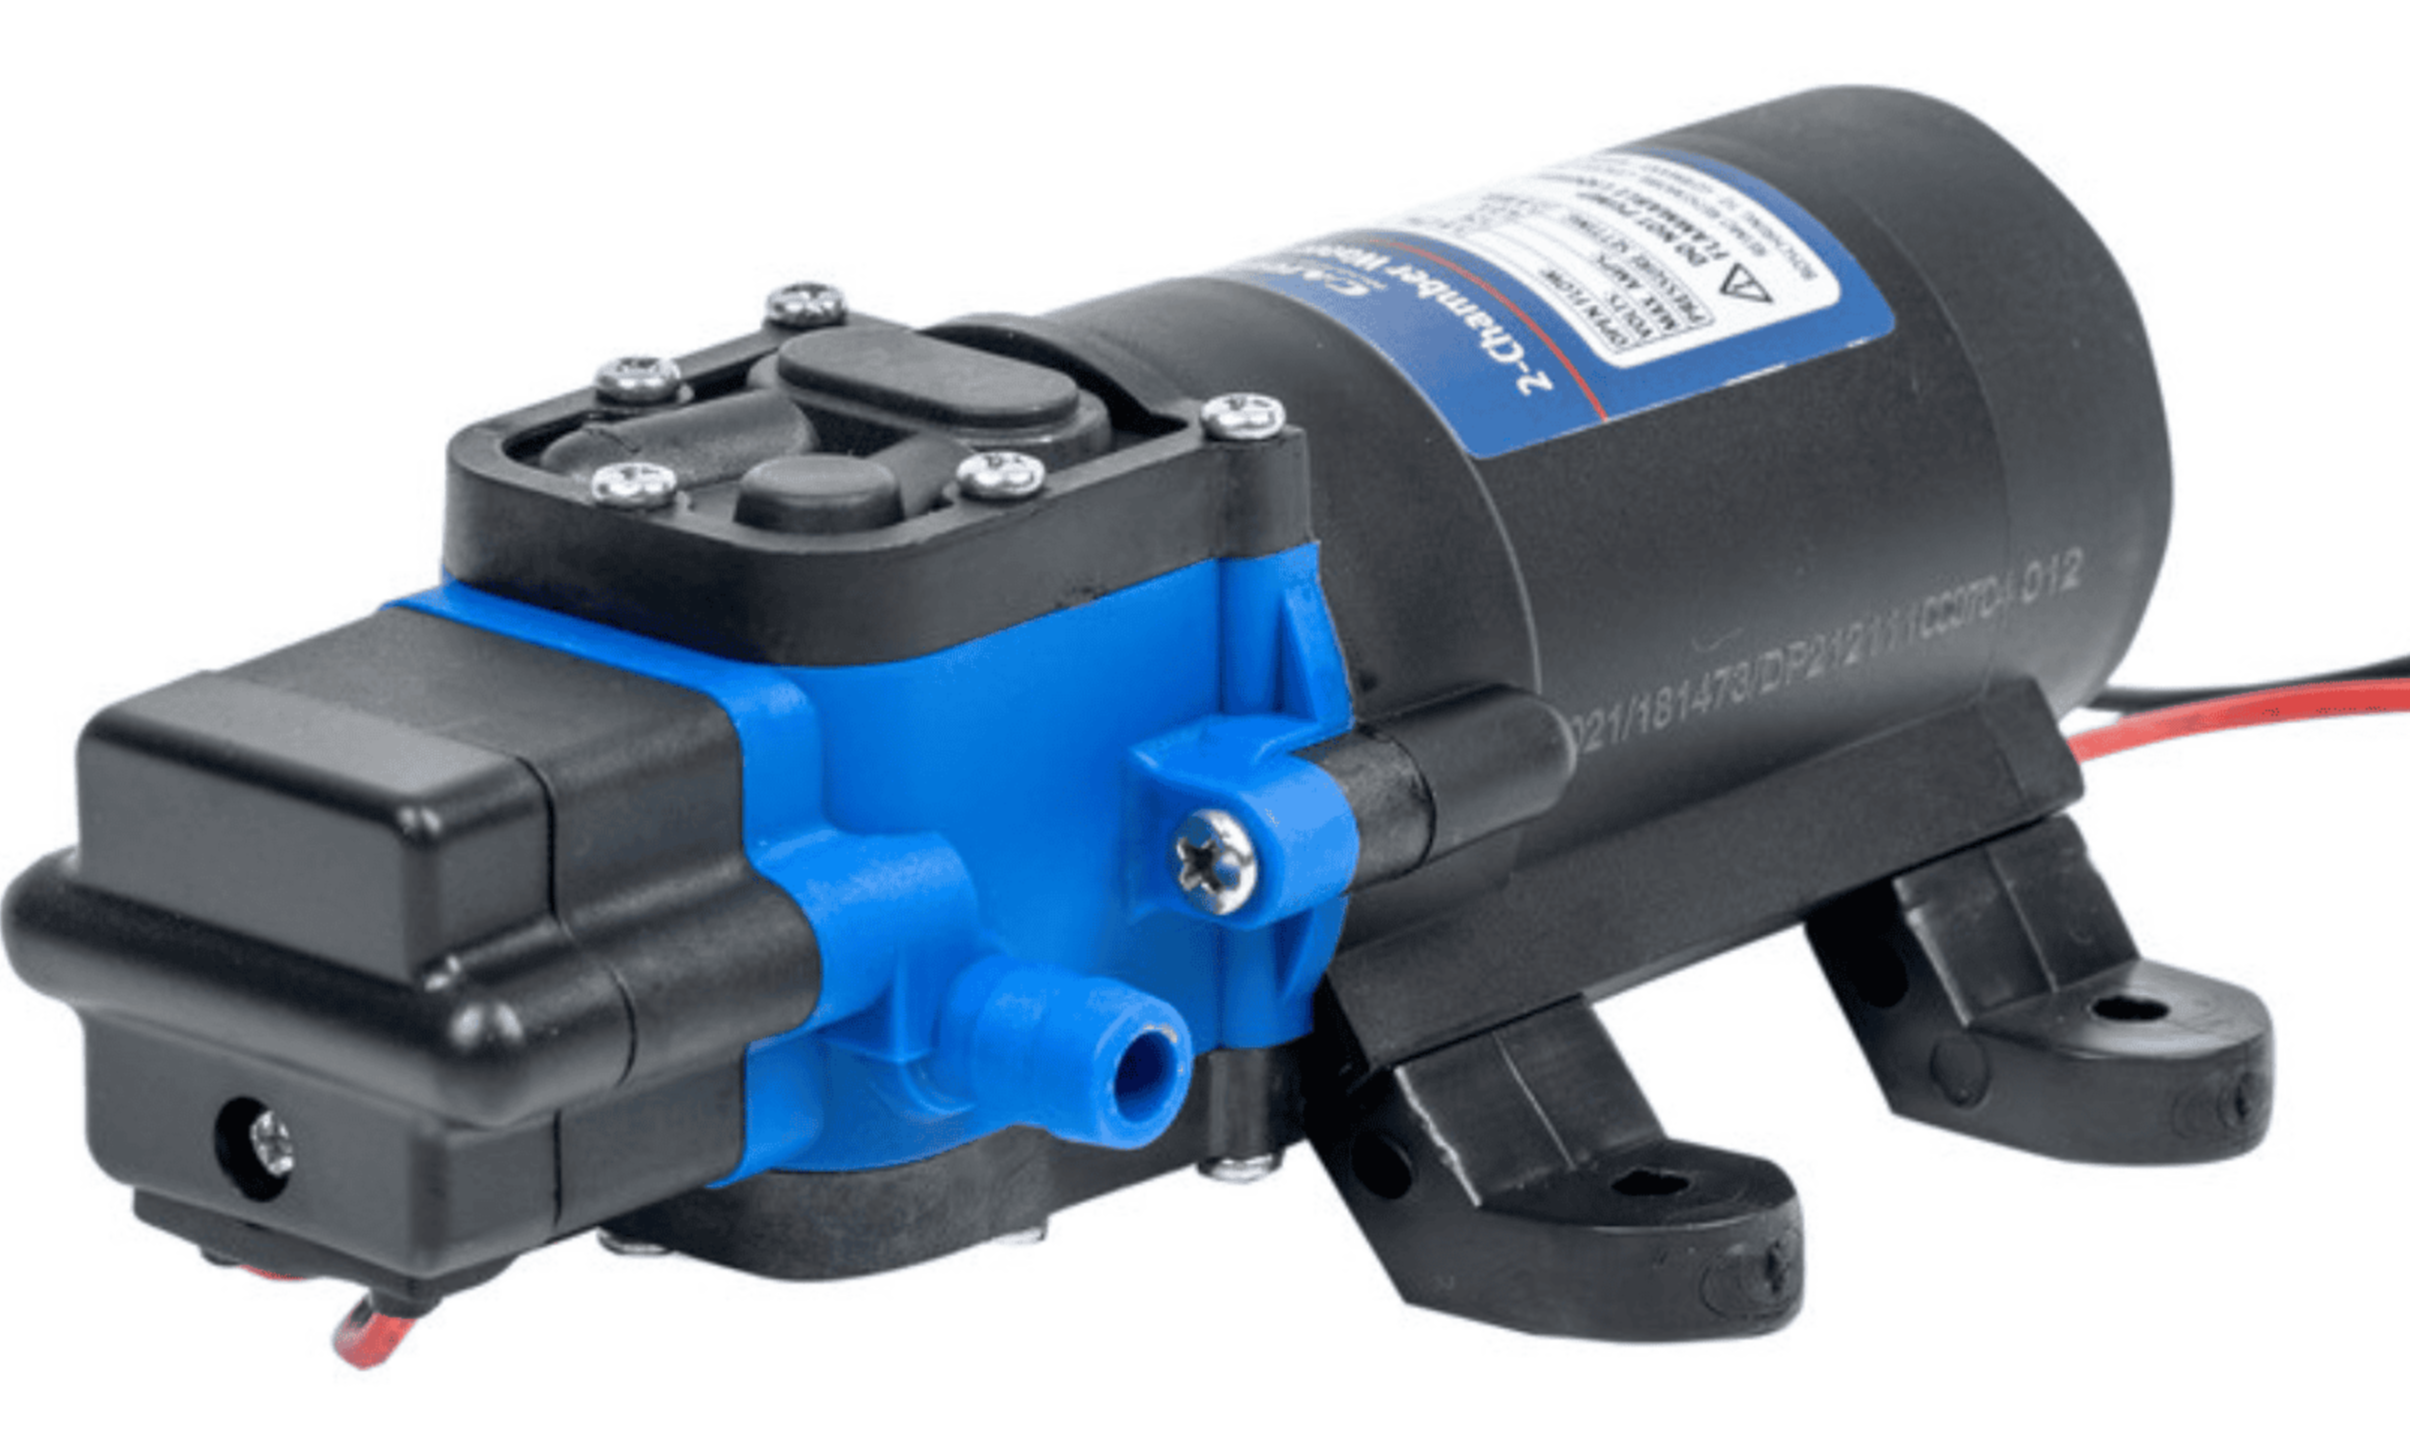
- Outlet to the Water Pump: Connect the tank’s outlet, which is usually located at the base to allow access to all the stored water , to the inlet port of your 12V water pump. Use food-grade plumbing lines for this connection, with flexible braided vinyl tubing or PEX being common choices . It is highly recommended to install a strainer at the water pump’s inlet to prevent any debris from the tank from entering and potentially damaging the pump . Consider adding a shut-off valve in this line to facilitate maintenance or repairs to the pump without draining the entire tank .
- Ventilation: A vent outlet is a necessary component of a fresh water tank system. It allows air to escape from the tank when you are filling it with water and to enter the tank when water is being drawn out. This prevents the formation of a vacuum, which could impede water flow . Often, the vent is integrated into the design of the fill inlet fitting.
- Drainage: Install a drain valve at the lowest point of the fresh water tank. This will allow you to easily empty the tank for cleaning, sanitization, or winterization purposes .
- Plumbing to Fixtures: From the outlet side of the water pump, run plumbing lines to all your intended water outlets within the campervan, such as the kitchen sink, shower, and any other faucets. Use appropriate plumbing fittings and connectors, such as barb-to-pipe fittings and PEX fittings, to ensure secure and leak-proof connections .
When making plumbing connections, it is advisable to use plumber’s tape (Teflon tape) on all threaded fittings to create a tight seal and prevent leaks . Ensure that all fittings are properly tightened according to the manufacturer’s specifications .
Maintaining Your Fresh Water Tank for Longevity and Hygiene
Regular maintenance of your fresh water tank is crucial for ensuring a long lifespan for the tank itself and maintaining a hygienic water supply .
Regular Cleaning Procedures: It is important to adopt a routine for cleaning your fresh water tank. Make it a practice to empty the tank regularly and avoid letting water sit stagnant for extended periods; ideally, no more than three days is recommended . If possible, empty the tank completely after each trip. Periodically, flush the tank with fresh water to remove any accumulated sediment or stale water. For a more thorough clean, perform a deep clean at least twice a year . This can be done using a commercially available water tank cleaner or a diluted bleach solution, typically about ¼ cup of non-scented bleach for every 15 gallons of water capacity . Always follow the specific instructions provided with the cleaning product. An alternative method involves using a hot white vinegar solution, with a ratio of approximately 2 gallons of white vinegar to 35 gallons of water, which is then recirculated through the system .
When using a bleach solution for cleaning, the general procedure involves first turning off the water pump and any water heater. Then, drain the entire water system. Prepare the diluted bleach solution and add it to the fresh water tank, followed by filling the rest of the tank with potable water. Turn the water pump back on and run water through all faucets (both hot and cold if applicable) until you can detect the smell of bleach. Then, turn off the pump and allow the bleach solution to sit in the system for a period ranging from 4 to 24 hours. Finally, drain the tank and all the lines completely and flush the system thoroughly with fresh water until no residual bleach odor remains . Remember to bypass your water heater and any onboard water filters during the sanitization process . Always use non-scented bleach for this purpose and ensure the system is flushed adequately afterward.
Sanitisation Methods and Frequency: Sanitisation is a more intensive cleaning process aimed at killing bacteria and other harmful microorganisms . It is generally recommended to sanitise your fresh water tank every six months or so . You should also sanitize after the campervan has been in storage or after winterising, after purchasing a new or used vehicle, if water has been sitting in the tank for more than two weeks, or if you have any reason to suspect the water source might have been contaminated . The method for sanitisation is similar to deep cleaning, often using a diluted bleach solution as the sanitising agent. Regular sanitisation is crucial for preventing the build-up of bacteria, algae, mould, and mildew, thereby ensuring a safe and healthy drinking water supply .
Troubleshooting Common Fresh Water Tank Problems
Winterisation Steps to Prevent Freezing: In colder climates, proper winterisation of your fresh water tank and the entire water system is essential to prevent damage from freezing water. The first critical step is to drain all water from the fresh water tank, the hot water tank (if you have one), and all the water lines. This is typically done by locating and opening the low-point drain valves and all the faucets within the van. If your system includes a water heater, make sure to bypass it to prevent antifreeze from filling its tank, which would be wasteful . Another effective method for removing residual water is to blow out the lines using compressed air, typically connected via the city water inlet, with the pressure not exceeding 45 PSI . After draining and blowing out the lines, you can add non-toxic RV antifreeze to the entire water system. This is done by pumping the antifreeze through all the faucets, the shower, and the toilet. It is crucial to use RV antifreeze, as automotive antifreeze is toxic . Pouring some antifreeze down the drains and into the toilet bowl will also protect the P-traps and seals from freezing. Before starting the winterisation process, it is important to remove or bypass any inline water filters, as antifreeze can damage them. Thorough winterisation is vital to avoid costly repairs that can result from frozen and expanding water. Remember that even internal tanks can freeze if the van’s interior temperature drops below 0 degrees celcious.
Even with careful installation and maintenance, you might encounter some common problems with your fresh water tank system .
Leaks: Leaks can occur due to various reasons, including loose fittings, cracks in the tank (possibly from impact or freezing), or damage to the plumbing lines. The first step in addressing a leak is to thoroughly inspect all connections and tighten any that appear loose. If you find a crack in the tank or a plumbing line, it will need to be repaired using an appropriate sealant or replaced entirely. Ensuring proper winterisation is the best way to prevent cracks caused by freezing water. Regular inspection of your water system can help you identify and address leaks in their early stages.
Contamination: Contamination of the fresh water supply can happen due to the growth of bacteria, algae, or mould, often caused by stagnant water or filling the tank from a contaminated source. To resolve this, implement a routine of regular cleaning and sanitization as described earlier. Using a high-quality water filter can also significantly reduce the risk of contamination. Always strive to fill your tank from known potable water sources. If you suspect contamination, drain and thoroughly clean and sanitize the tank before refilling. Maintaining a clean water tank is paramount for your health and safety.
Inaccurate Level Readings: If your tank level indicator is providing inaccurate readings, it could be due to mineral buildup on the tank sensors, a malfunction in the sensors themselves, or wiring issues . Try cleaning the sensors regularly to remove any mineral deposits. If the problem persists, the sensors might need to be replaced. Check the wiring connections to ensure they are secure and free from corrosion. As a backup, consider installing a secondary tank level gauge for more reliable monitoring. Inaccurate readings can lead to the inconvenience of unexpectedly running out of water or accidentally overfilling the tank.
No Water Flow (Pump Runs): If you hear your water pump running but no water is coming out of your faucets, several potential issues could be at play. First, check the obvious: is there water in the tank? If the tank is not empty, there might be a blockage in the water lines or the pump’s strainer. Inspect and clear any obstructions. It’s also possible that there is air trapped in the lines, which might require priming the pump according to the manufacturer’s instructions or bleeding the air from the system. Finally, the water pump itself might be faulty and require troubleshooting or replacement.
Pump Cycling On and Off (No Water Being Used): Hearing your water pump turn on and off repeatedly even when no water is being drawn typically indicates a problem. A common cause is a leak somewhere in the water system, causing the pressure to drop and trigger the pump. Another possibility is low pressure in the accumulator tank (if your system is equipped with one), or a faulty pressure switch on the water pump. Thoroughly inspect your system for any leaks. If you have an accumulator tank, check its pressure and adjust it as needed. If neither of these resolves the issue, the pump’s pressure switch might be malfunctioning and require troubleshooting or replacement. Frequent pump cycling can be a sign of an underlying problem and can also shorten the lifespan of your water pump.
Conclusion: Enjoying Fresh Water on Your Adventures
In conclusion, a well-planned and properly maintained fresh water tank system is fundamental to a comfortable and enjoyable campervan conversion. From understanding the different types of tanks available and choosing the right size for your needs, to ensuring the use of safe, food-grade materials and mastering the installation process, each step contributes to a reliable water supply on your travels. Regular cleaning, sanitisation, and proper winterisation are essential for the longevity of your system and the health of those using it. By understanding common problems and their solutions, you can address any issues that may arise and keep your water flowing smoothly. While optional, the integration of an accumulator tank can further enhance your water system’s performance and lifespan. With careful planning and execution, your campervan’s fresh water tank will undoubtedly become a vital component, supporting all your adventures and ensuring you always have access to this essential resource.